Carryover Temperature Calculator
Safe Chicken Removal Calculator
Stop cooking at the right temperature to prevent dry chicken. Chicken continues cooking after removal (carryover).
Key Science
The USDA recommends 165°F (74°C), but moisture loss begins at 150°F (65°C). Removing chicken at 155°F (68°C) allows carryover to reach the safe temperature while retaining moisture.
Carryover temperature rise typically ranges 5-10°F (3-6°C) for chicken.
Results
Recommended Safe Removal Temperature
155°F (68°C)Carryover temperature rise: 5-10°F
Final safe temperature: 160-165°F
Important: Always use a reliable instant-read thermometer. Remove chicken at 155°F (68°C) for moist results.
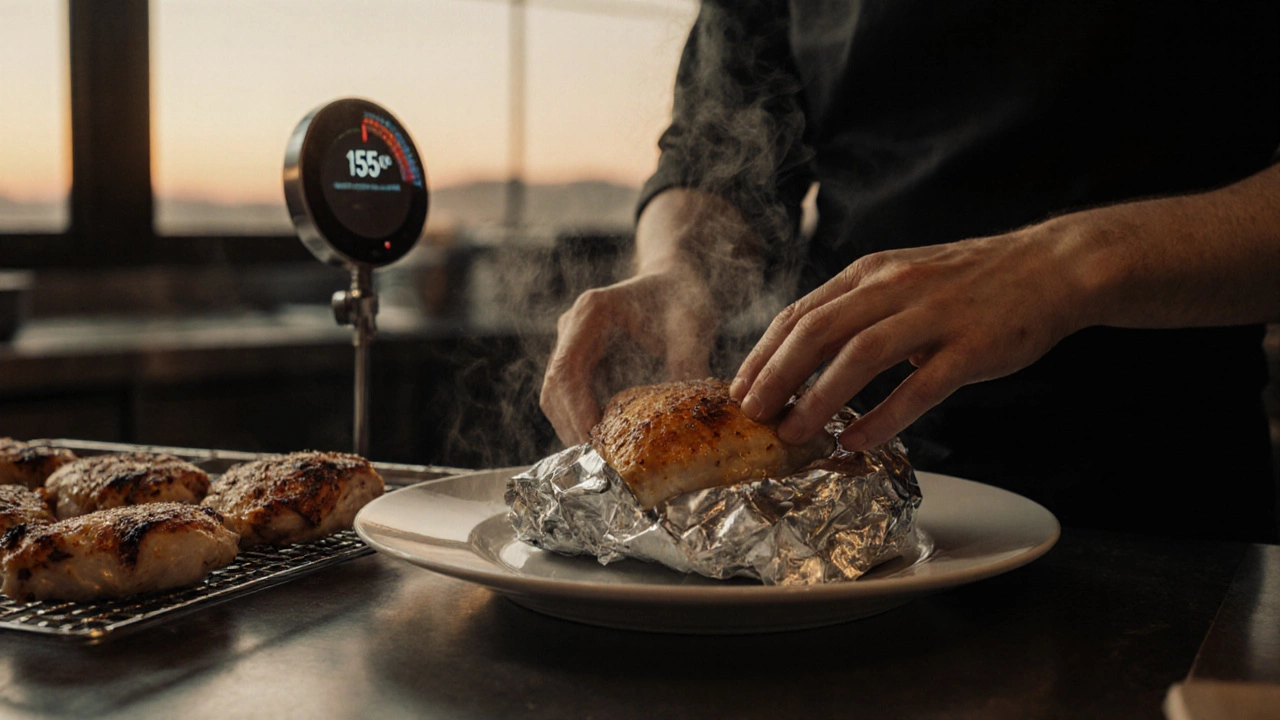
After removal: Cover with foil and let rest for 10 minutes. This allows carryover cooking to complete while the meat reabsorbs moisture.
Nothing ruins a good chicken dish faster than dry, chewy meat. You follow the recipe, cook it to the right temperature, yet it still comes out like cardboard. What’s going wrong? The truth is, chicken doesn’t stay juicy by accident. It takes understanding how heat affects muscle fibers, fat, and water - not just following a timer.
Why Chicken Dries Out
Chicken breast is lean. It has almost no fat to protect it from drying out during cooking. When you heat it, the proteins - mainly myosin and actin - start to tighten up. Around 150°F (65°C), they begin to squeeze out the water trapped inside the muscle cells. By 165°F (74°C), the temperature recommended by the USDA, most of that moisture is already gone. If you keep cooking past that point, it gets worse. That’s why overcooked chicken tastes like sawdust, even if it’s technically "safe."
Dark meat like thighs and drumsticks handle heat better. They have more connective tissue and fat, which melts slowly and keeps the meat moist. But even dark meat can dry out if you cook it too long or at too high a temperature.
Brining: The Secret Weapon
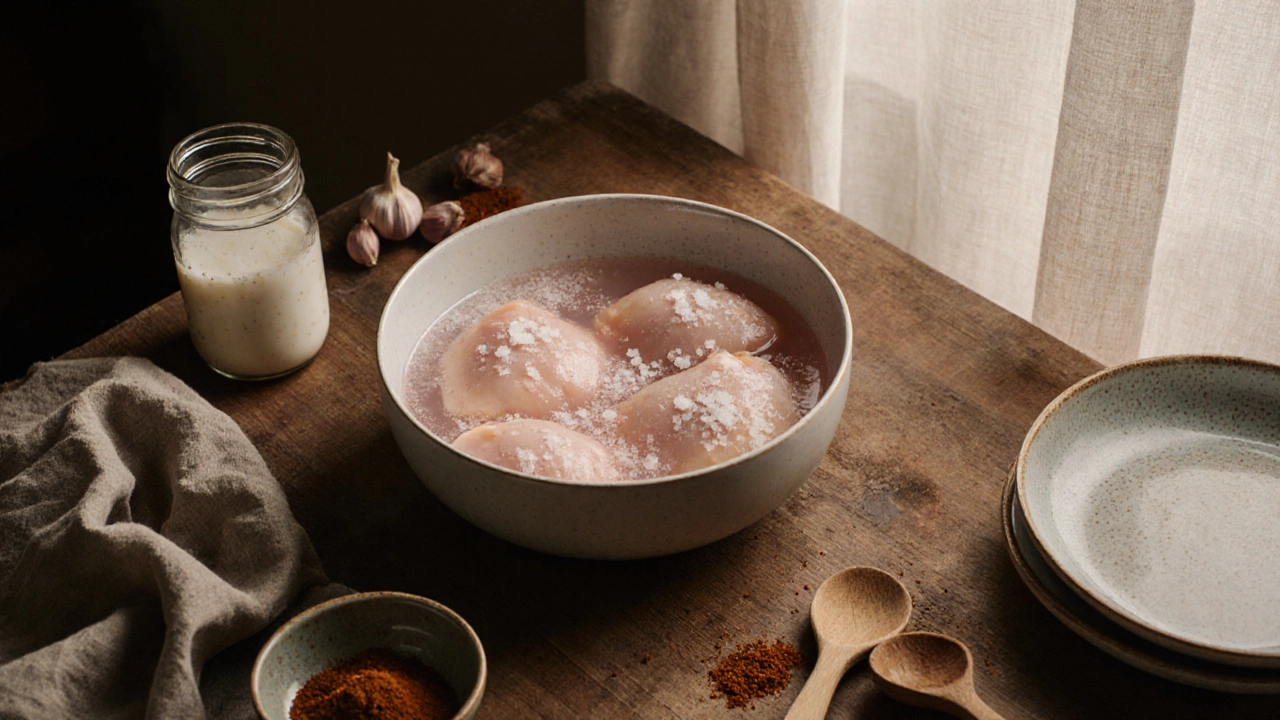
Brining isn’t just for Thanksgiving turkeys. It works even better on chicken. A simple saltwater soak - even for just 30 minutes - changes the game. Salt dissolves some of the muscle proteins, letting the meat hold onto more water. It also helps the meat retain moisture during cooking.
For a quick brine, mix 4 cups of cold water with 1/4 cup of kosher salt and 2 tablespoons of sugar. Stir until dissolved. Submerge the chicken pieces and refrigerate for at least 30 minutes. For best results, brine for 4-12 hours. Don’t rinse after brining - the salt is doing the work. Pat dry before cooking to get a better sear.
Wet brining isn’t the only option. Dry brining - rubbing salt directly on the chicken and letting it sit uncovered in the fridge for 12-24 hours - works just as well. The salt draws out moisture, then reabsorbs it along with seasoning. The result? Better flavor and a crispier skin.
Marinating for Flavor and Tenderness
Marinades add flavor, but not all of them tenderize. Acidic ingredients like lemon juice, vinegar, or yogurt can break down proteins - but only on the surface. If you marinate too long, the outer layer turns mushy while the inside stays tough.
Yogurt-based marinades are the exception. They contain lactic acid and enzymes that gently break down proteins without turning the meat fibrous. A 4-hour soak in plain yogurt with garlic, cumin, and paprika turns chicken into something tender enough to pull apart with a fork. This is why Indian tandoori chicken and Middle Eastern shawarma stay juicy even after grilling.
Oil in marinades helps carry flavor and protects the surface from drying out. A good rule: use 1 part acid to 3 parts oil. Add herbs, spices, and a touch of honey for balance. Marinate chicken for 2-6 hours. Overnight is fine for thighs, but skip it for breasts.
Temperature Control Is Everything
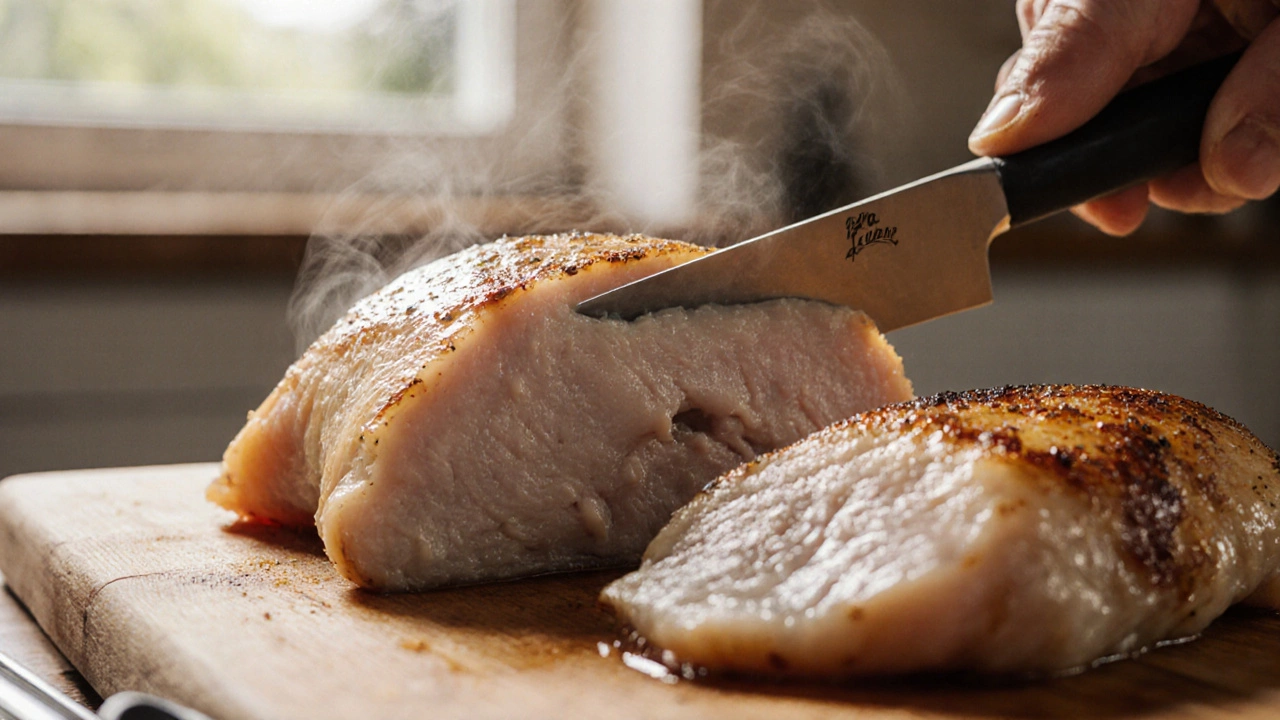
Stop cooking chicken at 155°F (68°C), not 165°F. The USDA says 165°F is safe, but that’s the temperature where most of the juice is already gone. Chicken continues to cook after you take it off the heat - that’s carryover cooking. Remove it at 155°F, cover it loosely with foil, and let it rest for 10 minutes. During that time, the internal temperature rises to 160-165°F, killing any bacteria while keeping the meat juicy.
Use a reliable instant-read thermometer. Don’t guess. Poke it into the thickest part of the breast or thigh, avoiding bone. If you don’t have one, you’re flying blind. A $15 thermometer saves more chicken than any fancy technique.
Resting Isn’t Optional
Letting chicken rest after cooking isn’t a suggestion - it’s physics. When meat cooks, the juices get pushed toward the center. If you cut into it right away, those juices spill out all over the plate. Resting lets the muscle fibers relax and reabsorb the liquid. Ten minutes is enough for breasts. Thighs can rest up to 15 minutes.
Place the chicken on a warm plate, not a cold one. Cover with foil, but don’t seal it tight - steam can make the skin soggy. The goal is to keep it warm without trapping moisture.
Choose the Right Cut and Cooking Method
Not all chicken is created equal. Bone-in, skin-on pieces cook more evenly and stay juicier than boneless, skinless breasts. The skin acts as insulation, and the bone helps conduct heat slowly. If you’re roasting or grilling, go for thighs, drumsticks, or whole legs. They’re forgiving.
For chicken breasts, try butterflying them. Slice horizontally through the thickest part, then open it like a book. Now you have two even-thickness pieces that cook in 6-8 minutes instead of 20. No more dry ends and raw centers.
Poaching and sous vide are two methods that guarantee moisture. Poaching in gently simmering broth (never boiling) keeps the temperature low and steady. Sous vide lets you cook chicken at exactly 145°F for 1-2 hours - it comes out like butter. Then sear it fast for color.
Don’t Overcrowd the Pan
When you pile too many chicken pieces into a skillet, they steam instead of sear. Steam = soggy skin. Searing = flavor and a protective crust that locks in juices. Give each piece space. Cook in batches if needed. A hot pan, a little oil, and patience make all the difference.
Same goes for the oven. Crowded baking sheets trap moisture. Use a wire rack on the pan so air circulates around the chicken. That’s how you get crispy skin and juicy meat at the same time.
Leftovers: Keep Them Moist
Reheating dry chicken is the worst. Microwaving it straight from the fridge turns it into rubber. Instead, add moisture. Toss leftover chicken in a little broth, olive oil, or even a splash of lemon juice. Cover with a damp paper towel and microwave in 30-second bursts. Or reheat it gently in a skillet with a tablespoon of water or stock, covered, over low heat.
Shred it and mix it into soups, tacos, or pasta. The sauce or broth rehydrates it naturally. Dry chicken leftovers aren’t a failure - they’re just waiting for the right recipe.
Final Rule: Trust Your Senses, Not Just the Timer
Recipes give you time ranges. But ovens vary. Chicken sizes vary. Even the fridge temperature affects how fast it cooks. The only real test is touch and temperature. Press the thickest part of the breast - if it springs back slowly, it’s done. If it feels firm and doesn’t bounce, it’s overcooked. If it feels soft and squishy, it needs more time.
Combine brining, proper temperature, resting, and smart cooking methods, and you’ll never serve dry chicken again. It’s not magic. It’s science. And once you understand it, you’ll cook chicken with confidence - not fear.